How to set up Google Analytics 4 - a complete guide
Universal Analytics will cease and stop working on July 1, 2023. And as you probably know, it will be replaced by Google Analytics 4, a new way to measure apps and websites. The latest version of GA is designed to work in a world without cookies or identifying data.
However, it doesn’t import any historical data from Universal Analytics, so there is no time to waste if you still haven’t upgraded to GA4 yet! The sooner you add GA4, the more historical data you will be able to access, and the more time you will have to familiarize yourself with the reports.
INFO: You'll still be able to visit your Universal Analytics reports for a period of time after July 1, 2023. New data will only be collected through Google Analytics 4 properties.
How to set up Google Analytics 4
The Google Analytics hierarchy starts with an account. An account can contain up to 100 properties. If you manage only one website, then you need only one property.
To create a new Google Analytics 4 property, go to the Admin section at the bottom-left corner and click Create Property.
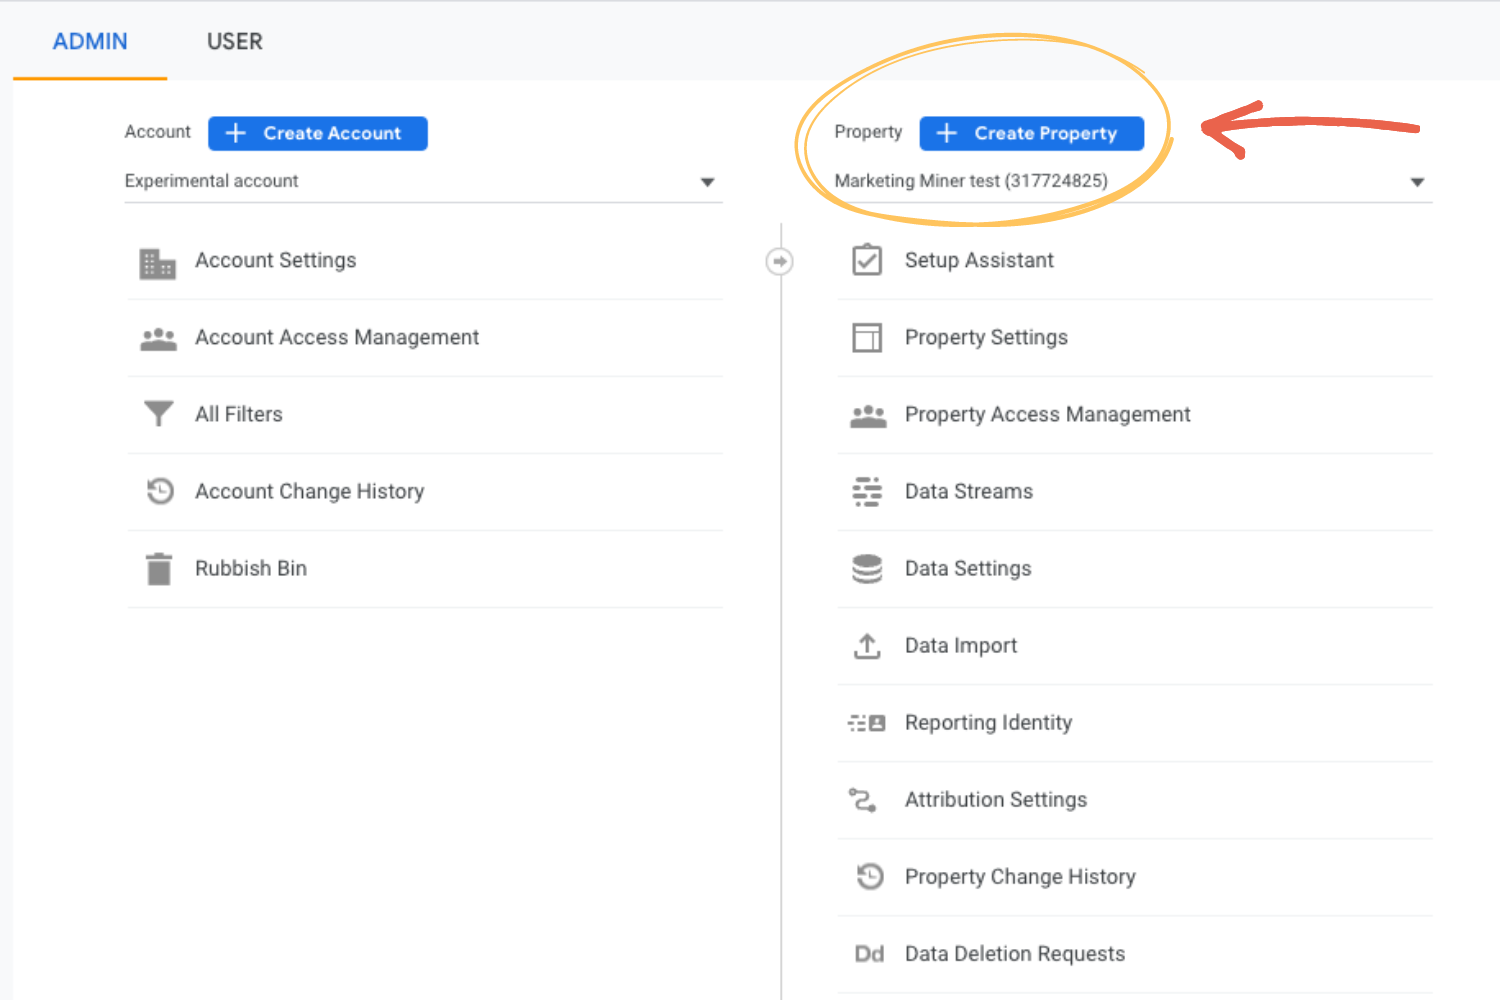
Then enter a name for the property (e.g., Marketing Miner test) to quickly recognize the website in your account and select the reporting time zone and the main currency that users use to buy your products or services. You don’t have to pay attention to the Show advanced options, as it’s only there for users who are switching from GA4 to UA.
Click Next. You can also select your industry category and business size or simply skip this step by clicking Create to set up your Google Analytics 4 property.

Well done! Your new property is ready.
Now it’s time to configure your first data stream to start measuring data on your website. You can have multiple data sources in a single property.
We won’t show you how to set up your GA4 with the Setup Assistant wizard, as there are already so many guides available online. Instead, we will show you how to successfully install Google Analytics 4 with Google Tag Manager on your website and describe all the steps you will take.
Here’s a quick summary:
- Create a new Google Analytics 4 property
- Create a data stream
- Copy your Measurement ID
- Create a Google Analytics 4 Configuration tag in Google Tag Manager
- Paste your Measurement ID and set the tag to fire on All Pages
- Test the GA4 configuration tag and publish the changes
Try Marketing Miner now:
Get data to your Google Analytics 4
To start collecting data in GA4, you need to set up a data stream first. Firstly, choose for what platform you want to measure data: Web, Android or iOS app. In this guide, we will focus on collecting data for a website.
Enter your website URL and stream name. Make sure you got these two details right as you won’t be able to change them later on. For now, we want to turn off the Enhanced Measurement settings to simplify the next steps as much as possible.
Click Create stream once you’re done to generate your Measurement ID. There are two ways to install the GA4 code on your website to start collecting data:
- copying the global site tag into the <head> section of your HTML
- installing the configuration tag via Google Tag Manager

We recommend reading these instructions if you decided to add the global site tag to your website manually.
Install Google Analytics 4 with Google Tag Manager
Installing GA4 with Google Tag Manager is super simple and you can set it all up in only 5 minutes. If you've never heard of Google Tag Manager, you are certainly missing many advantages. And we recommend you creating a GTM account as soon as possible to save you a lot of time and effort in the future. :-)
Copy your Measurement ID from GA4 and navigate to your Tag Manager container. Click the New Tag button and don’t forget to name the tag (e.g., GA4 – config).
- Tag = a code that sends data to GA4
- Triggering = a condition that must be met for a tag to fire
Start by clicking on the Triggering section and selecting All Pages trigger. This trigger will ensure firing the GA4 tag on all pages. Now, navigate to the Tag Configuration and choose the Google Analytics: GA4 Configuration from the tag type list.
Enter the Measurement ID from your GA4 property’s data stream (e.g., G-F2E482XYCJ) and click on the Save button.

TIP: If you use Google Chrome, you can install the Google Tag Assistant tool to verify that you installed your tags correctly on your pages and see what other tags are firing.
By submitting this tag, you will automatically start measuring the following events in GA4: first visit, session start and page view.
Now it’s time to go back to the Web stream details in Google Analytics to enable the Enhanced Measurement and start measuring interactions with your content on a site. From this moment, your GA4 will start automatically tracking the following events: page views, scrolls, outbound clicks, site searches, video engagements and file downloads.

TIP: Some events can be customized or turned off additionally in the settings.
After you install Google Analytics 4 and start collecting data, the next step is to think about additional events that you might want to measure. Tracking user activity with Google Analytics 4 will help you better understand how well your users engage with your content.
For example, measuring scroll depth will give you an indication of how much users are digesting your content, especially if your engagement rate is too low. Scroll tracking is a must-have for all content-heavy sites.
To set up the scroll depth trigger, click the New button in the Triggers window and select Scroll Depth for Trigger Type.
Now select vertical scroll depths (or horizontal) for scroll direction and determine the scroll depth threshold and units. We entered 25, 50, 75, 100 as the percentages, so we can then report on people scrolling 25%, 50%, 75% and 100% of blog articles. You also mainly want the trigger to fire on specific pages, which can be set up by choosing Some Pages and determining conditions when this trigger should be fired.

You can track this data in the GA4 Engagement report under Events. Furthermore, you can combine this event with other metrics to get additional insights into user behavior. For example, you can also track outbound link clicks, group pages by post author name or category, form submission, and many more!
As you can see, setting up Google Analytics 4 doesn’t have to be so complicated, and we hope this step-by-step guide left you feeling calm about the upcoming changes.
We would also like to say a big thank you to Jan Tichy, a GA4 expert and our webinar guest speaker, for being a big inspiration for this article and sharing his knowledge with us!
Iveta Osobová

Similar articles

An SEO audit is an integral part of your website’s success. It's also often one of the first steps (together with the keyword research) that SEO specialists take when working on new web projects.
In short, it’s a review of tech...

Keyword research is one of Marketing Miner’s highlights to simplify your work and collect all important data. It is one of the cornerstones of any digital marketing strategy. It provides you with the data and insights that not only every SEO an...

Less than 2 weeks ago Google Data Studio announced a great opportunity for their community - the Connectors. They provide developers with a way of how to connect Data Studio with their tools and import data right into Google Data Studio.
We couldn&r...